Hey everyone, hope you are having an incredible day today. Today, I’m gonna show you how to make a special dish, danish-style bread made easy with puff pastry in a bread maker. One of my favorites. For mine, I’m gonna make it a little bit tasty. This will be really delicious.
This easy cheese danish recipe is made with puff pastry. I love having puff pastry on hand in the freezer because there are so many awesome pastries that you can make And I love a good pastry! This cheese danish is awesome because it is almost like have cheesecake in breakfast form, haha.
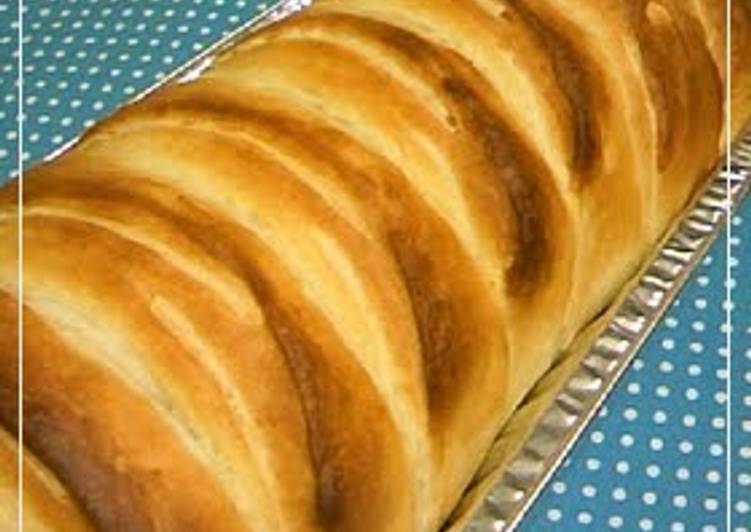
Danish-Style Bread Made Easy with Puff Pastry in a Bread Maker is one of the most popular of recent trending meals in the world. It’s appreciated by millions every day. It’s simple, it’s quick, it tastes yummy. Danish-Style Bread Made Easy with Puff Pastry in a Bread Maker is something that I have loved my entire life. They are fine and they look fantastic.
To begin with this particular recipe, we have to first prepare a few components. You can have danish-style bread made easy with puff pastry in a bread maker using 9 ingredients and 7 steps. Here is how you can achieve that.
The ingredients needed to make Danish-Style Bread Made Easy with Puff Pastry in a Bread Maker:
- Get 250 grams ■Strong bread flour
- Make ready 30 grams ■Cake flour
- Prepare 40 grams ■Sugar
- Prepare 3 grams ■Salt
- Get 1 tbsp ■Skim milk
- Make ready 180 ml ■Milk
- Prepare 40 grams Butter (or margarine)
- Make ready 4 grams Dry yeast
- Make ready 1 sheet Frozen puff pastry
Puff Pastry Recipes Savory, Puff Pastry Appetizers, Savoury Baking, Appetizer Recipes, Recipes Using Puff Pastry, Puff Pastry Pinwheels, Vegetable Ready to start making your own bread? Then this No Knead Rosemary Garlic Bread is the perfect, easy, no kneading required bread to start with! Mix and knead to make a cohesive, but quite sticky dough. This is easily done in a bread machine set on the dough cycle; or in a mixer.
Instructions to make Danish-Style Bread Made Easy with Puff Pastry in a Bread Maker:
- Place the ingredients marked ■ into the bread pan, and start it on the dough course! Place the yeast into the designated spot. Add in the butter after 10 minutes.
- Roll up the dough after it is finished, cover with a wet cloth, and let it sit for 15 minutes.
- Lightly release the gas, stretch it out with a rolling pin, and roll it up with the defrosted puff pastry. Stretch out the dough, roll it up from the front, and close it tightly.
- Place the seam towards the bottom, and cut notches into about 10 places. Cut down vertically while angling the pan a bit at a time.
- Spray with water and let it rise for the second time at 35°C for about 35 minutes.
- Bake in the oven at 200°C for 10 minutes, then reduce it to 180°C, and bake for an additional 20 minutes. Cover it with aluminum foil if it looks like it is going to burn in the process.
- The fluffy and chewy and sometimes crispy texture is delicious when toasted.
Use your fingers to press the centers of the dough rounds as flat as possible, leaving the "sidewalls" puffed. Quick and easy Danish Pastries from scratch? Easier than you think if you follow this recipe for The method works along the same principle as rough puff pastry and works remarkably well while Can you believe that the first time I made Danish pastries I was cooking in my living room, in a temporary. This is a really quick way to make Danish pastries with a packet of ready-made puff pastry. Drizzle the warm pastries with a little lemon flavoured glace icing and sprinkle with flaked almonds instead of dusting with icing, if liked.
So that is going to wrap it up with this special food danish-style bread made easy with puff pastry in a bread maker recipe. Thank you very much for reading. I am sure you can make this at home. There is gonna be interesting food in home recipes coming up. Don’t forget to bookmark this page in your browser, and share it to your family, colleague and friends. Thank you for reading. Go on get cooking!